Introduction: Is Your Back Sticking a Pin in Your Life?
Let’s be real. If you’re reading this, your back probably hurts. You might be that person who flinches when you bend down to tie your shoes, or the one who shifts awkwardly in your office chair every five minutes.
You are absolutely not alone. Back pain is practically a modern epidemic. Whether it’s a dull, nagging ache or a sharp, sudden spasm, it can steal your focus, sabotage your sleep, and make even the simplest movements feel like a monumental task. You’ve tried heat packs, cold packs, maybe even those tiny, pricey pills. But what if the answer wasn’t in a pharmacy, but right there in your own body?
The solution isn’t about being perfectly flexible or twisting yourself into a pretzel. It’s about being strong, aligned, and mindful. And that’s where the magic of yoga comes in.
Yoga is not just a trendy workout; it’s a centuries-old, tried-and-true method for bringing balance back to your body. When it comes to back pain, we’re not aiming for a sweaty, fast-paced Vinyasa flow. We’re aiming for slow, deliberate, therapeutic movements that gently coax your spine back into its happy place, strengthen the essential support crew of muscles around it, and calm down the nervous system that often amplifies your pain.
In this ridiculously comprehensive guide (yes, it’s long, but your spine deserves the detail!), we’re going to dive deep. We’ll explore why your back hurts, how yoga fixes it, and most importantly, we’ll walk through 7 phenomenal poses—your new secret weapons—that truly work. We’ll cover step-by-step instructions, must-know modifications, and critical safety tips for each one.
Get ready to breathe easier, move better, and give your back the loving attention it has been craving.
Section 1: Understanding Back Pain – It’s Not Your Fault, It’s Your Desk
Before we treat the pain, we need to understand the source. In about 90% of cases, back pain isn’t caused by a severe, sudden injury. Instead, it’s a slow accumulation of imbalances that finally decide to rebel all at once.
The Three Usual Suspects Behind That Ache
1. The Tightness-Weakness Duo (The Office Worker’s Bane)
Think about your average day. You spend hours hunched forward, whether driving, staring at a screen, or scrolling on your phone. This posture does two terrible things:
- It Tightens Your Front: Your hip flexors and chest muscles get short and tight, pulling your spine forward and increasing the arch in your lower back.
- It Weakens Your Back: The core muscles (abdominals, glutes, and the small muscles along your spine) meant to hold you upright essentially fall asleep.
When you ask those weak, sleepy muscles to suddenly lift a grocery bag, or even just stand up straight, they panic, strain, and send a huge “Ouch!” signal.
2. Poor Posture and Spinal Compression
Your spine is a brilliant, flexible structure designed to absorb shock. But when you slump or slouch, you compress the discs—those jelly-filled cushions between your vertebrae. Over time, this constant squeezing can cause those discs to bulge or irritate the nerves that run down your legs (hello, sciatica!).
Yoga helps by gently decompressing the spine and building the strength to hold a more natural, healthy alignment.
3. Stress and the Nervous System
Here’s the part people often miss: your mind is intrinsically linked to your back. When you’re stressed, anxious, or perpetually running on high adrenaline (the “fight-or-flight” mode), your muscles automatically tighten. Your shoulders creep up to your ears, your jaw clenches, and the small, protective muscles around your spine go into a permanent, exhausting state of contraction.
Yoga’s focus on deep, rhythmic breathing (pranayama) is a direct line to your parasympathetic nervous system (the “rest and digest” mode). By calming the mind, you signal to your muscles that they can finally relax their iron grip, which is a massive relief for the back.
🚨 The Crucial Safety Check: When to Skip the Yoga Mat
While yoga is a safe, effective relief for most non-specific back pain, there are times you must see a doctor before trying any exercise, including the poses in this guide. This is known as checking for “Red Flag” symptoms:
- Sudden, Severe, or Excruciating Pain: If the pain comes out of nowhere and is disabling.
- Unexplained Weight Loss or Fever: These can be signs of infection or other serious conditions.
- Bowel or Bladder Changes (Incontinence): This can indicate a rare but serious condition called Cauda Equina Syndrome. This is a medical emergency.
- New or Worsening Numbness or Weakness: If you feel significant loss of sensation or struggle to lift your foot (foot drop).
- Pain that is Worse at Night or Unrelieved by Rest: Most mechanical back pain improves when you lie down. Pain that keeps you awake suggests another cause.
If you have a known condition like a severe disc herniation, spinal stenosis, or spondylolisthesis, you must speak with your physical therapist or doctor first, as some movements (like deep forward folds or extreme backbends) might be temporarily off-limits.
Section 2: Why Yoga? The Science of Back Relief
You might be thinking, “Why is yoga any better than just stretching or going to the gym?” The difference lies in its holistic approach. It targets the physical causes and the mental tension.
The Quadruple Threat of Yoga for Back Health
1. Spinal Mobilization & Decompression
Unlike running or weight training, yoga uses gentle, controlled movements that lubricate the spine’s joints and create space between the vertebrae. This decompression is literal relief for compressed nerves and bulging discs. Movements like Cat-Cow are spinal movement therapy designed to restore natural, fluid motion.
2. Building the ‘Inner Corset’ (Core Strength)
True core strength is not about having a six-pack. It’s about the deep, stabilizing muscles (the transverse abdominis and the multifidus) that act as an internal weight belt to support your lumbar spine. Many yoga poses, even the simple ones, require you to subtly engage these muscles, training them to stay “on” during daily life. A stronger core takes the load off your back.
3. Restoring Flexibility Where You Need It (Hips and Hamstrings)
Tight hips and hamstrings are a massive, often unrecognized contributor to back pain. When these muscles are too short, they tilt your pelvis out of alignment, which forces your lower back to compensate. We’ll focus on poses that open these areas, relieving the tension that often tugs on your sacrum and lower spine.
4. The Mind-Body Connection (The Anti-Tension Switch)
This is the “special sauce.” The focused breathing and mindfulness aspect of yoga teach you awareness. You learn to recognize exactly where you’re holding tension and—crucially—how to let it go. By consciously slowing your breath and focusing inward, you directly lower your heart rate, reduce the stress hormone cortisol, and dial down the pain signals in your brain. This is a profound, drug-free way to manage chronic pain.
Section 3: Your 7-Pose Back Pain Relief Sequence
This sequence moves from restorative relaxation to gentle mobilization, then to safe strengthening, and finally, to focused flexibility. Aim for a quiet, comfortable space and use a mat, blanket, or folded towel for padding.
1. Child’s Pose (Balasana) – The Gentle Reset
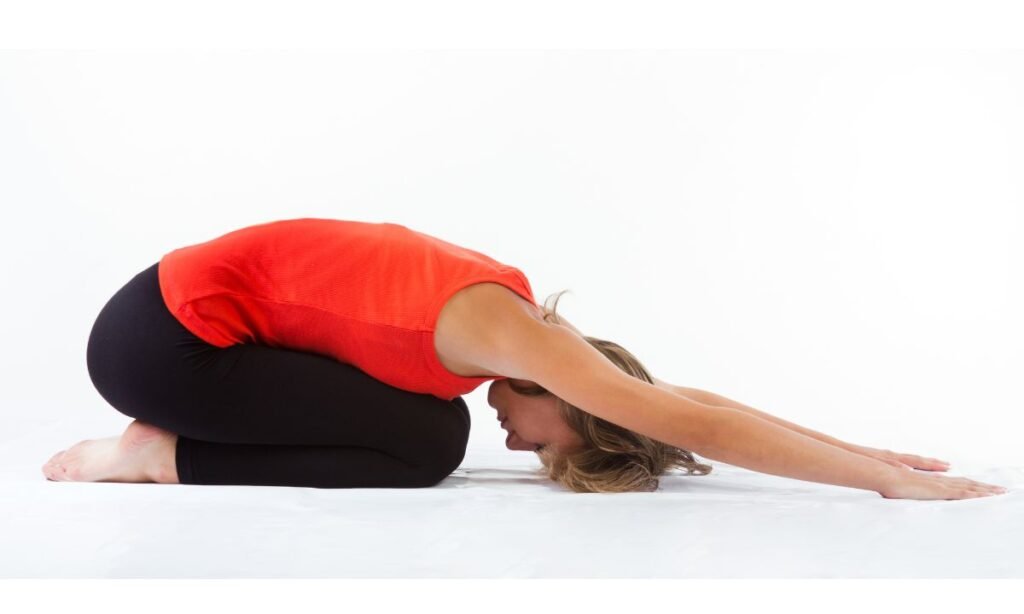
This is your baseline, your retreat, and the pose you come back to anytime you feel pain or need a rest. It is the ultimate expression of surrender and gentle decompression.
Why This Pose Works:
It immediately de-loads the lumbar spine, gently stretching the hips, thighs, and ankles. By allowing the belly to soften between the thighs, you get a lovely, subtle lengthening of the lower back muscles (the lumbosacral region). It’s also a powerful pose for calming the nervous system.
Step-by-Step Instructions:
- Start on all fours: Kneel on your mat. Bring your big toes to touch and let your knees be as wide as is comfortable—they can be hip-width or as wide as your mat (wider is often easier for the back).
- Fold Forward: On an exhale, slowly sit your hips back toward your heels.
- Rest Your Torso: Lower your torso down between your thighs, letting your forehead rest on the mat, a block, or a folded blanket (using a prop here is a wonderful, restorative move).
- Arm Position: You have two options:
- Active (Gentle Stretch): Extend your arms straight forward along the mat.
- Restorative (More Relief): Bring your arms back alongside your body, palms facing up, letting your shoulders totally round and relax.
- Breathe: Take 5 to 10 deep, slow breaths here. Feel the breath expand into your back ribs, which is like an internal massage for the spine.
Important Modification/Prop Tip:
If your hips don’t comfortably reach your heels, place a rolled-up blanket or pillow between your hips and your calves. If your forehead doesn’t reach the floor, stack your fists or use a yoga block under your head. The goal is complete, supported relaxation.
Crucial Safety/Avoid If:
If you have a knee injury or a current, severe flare-up of back pain that is sharp upon folding. In that case, lie on your back and hug your knees to your chest instead.
2. Cat-Cow Pose (Marjaryasana-Bitilasana) – The Spinal Lubricator

This flowing movement is one of the most therapeutic things you can do for your back. It’s not about strength; it’s about mobility—waking up every single vertebra and getting the spinal fluid circulating. It’s the perfect warm-up.
Why This Pose Works:
It gently mobilizes the spine from a position of zero gravity and zero strain. The Cat phase stretches the posterior chain (the back of your body), and the Cow phase stretches the abdominal muscles and strengthens the back muscles slightly. Done slowly and mindfully, it reintroduces the spine to its natural range of motion.
Step-by-Step Instructions:
- Start on all fours: Place your hands directly under your shoulders and your knees directly under your hips. Spread your fingers wide and press down evenly. Keep your neck long, looking down at the floor between your hands.
- Inhale (Cow Pose): Drop your belly toward the floor, lift your sitting bones (tailbone) toward the ceiling, and gently lift your chest and gaze. Think of lengthening your front body.
- Exhale (Cat Pose): Press into your hands and knees, round your spine up toward the ceiling like a Halloween cat, tuck your tailbone and chin toward your chest, and pull your belly button up toward your spine.
- Flow: Continue to slowly and smoothly transition between Cow (inhale) and Cat (exhale) for 1 to 2 minutes. Let your breath guide the speed of the movement.
Important Modification/Prop Tip:
If your wrists hurt, place your hands on a rolled-up mat or a pair of yoga blocks to change the angle. For sensitive knees, place a folded blanket or extra padding under them.
Crucial Safety/Avoid If:
If you have a known disc herniation, be cautious. Avoid arching (Cow) or rounding (Cat) too forcefully. Keep the movements small and focus on gentle, central movement.
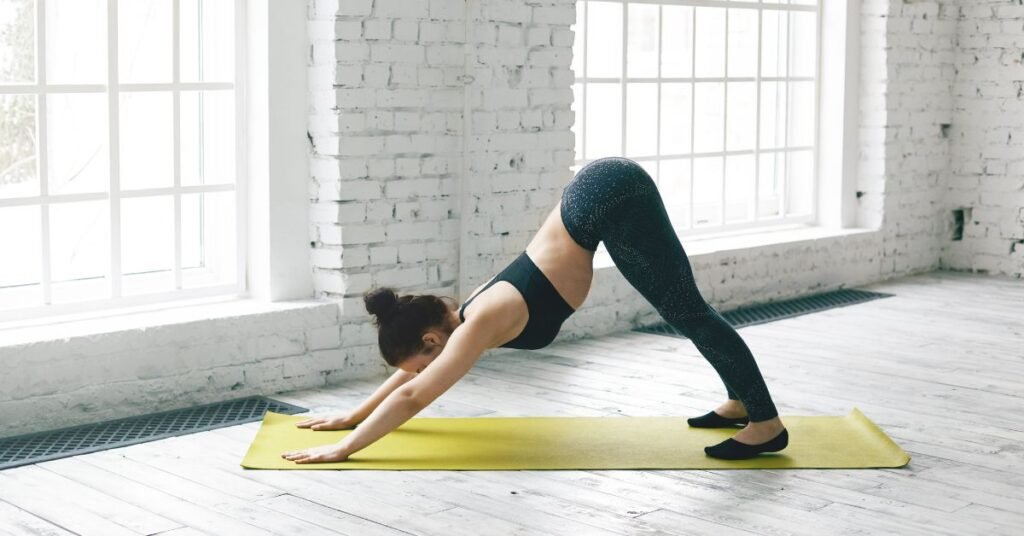
3. Downward-Facing Dog (Adho Mukha Svanasana) – The Full-Body Decompressor
Don’t let this famous pose intimidate you! When done with bent knees, it’s not just a stretch; it’s an incredible full-body pose that literally uses gravity to decompress and lengthen the spine.
Why This Pose Works:
By pressing your hips back and up while pressing your hands forward, you create an amazing line of traction that actively decompresses the vertebrae in your spine. It also strengthens the shoulders and upper back (essential for better posture) and stretches the hamstrings, which are notorious for pulling the pelvis out of alignment and causing back pain.
Step-by-Step Instructions:
- Start on all fours (just like Cat-Cow).
- Set Up: Tuck your toes under. Spread your hands wide.
- Lift and Lengthen: On an exhale, press into your hands, lift your knees off the ground, and push your hips up and back toward the ceiling. Your body should resemble an inverted ‘V’.
- The Secret for Back Pain: Keep a generous bend in your knees! This is the key. Bending your knees allows you to focus 100% of the stretch on lengthening your spine, rather than pulling on your hamstrings (which can sometimes aggravate the back).
- Find Length: Push the floor away from you with your hands, drawing your chest toward your thighs. Let your head hang heavy, relaxing your neck. Focus on creating length from your hands all the way up to your tailbone.
- Hold and Breathe: Hold for 5 to 8 slow, steady breaths. You can also “pedal your feet” (bend one knee, then the other) for an active stretch.
Important Modification/Prop Tip:
If you feel pressure in your wrists, place them on yoga blocks. If you still can’t get that wonderful spinal length, take a few steps forward with your feet to shorten the distance.
Crucial Safety/Avoid If:
If you have severe wrist injuries or a significant uncontrolled blood pressure issue (since your head is below your heart). If you have a known shoulder injury, keep the stretch gentle.
4. Sphinx Pose (Salamba Bhujangasana) – The Gentle Back Strengthener
While forward folds feel great in the moment, for long-term back health, we must gently introduce back-strengthening movements. Sphinx is the perfect entry-level backbend because it’s completely supported.
Why This Pose Works:
This pose is designed to encourage lumbar extension (the opposite of being hunched over). It safely engages the paraspinal muscles—the small but mighty muscles that run along the sides of your spine. Strengthening these muscles is critical for supporting the vertebral column and improving your default standing and sitting posture.
Step-by-Step Instructions:
- Start on your belly: Lie flat on your stomach with your legs extended straight back.
- Position Your Arms: Bring your elbows directly underneath your shoulders. Your forearms should be parallel to one another, extending forward with your palms flat on the mat.
- Engage and Lift: Gently press down through your forearms and hands, and use this connection to lift your chest slightly. You should feel a very gentle, comfortable curve in your lower back.
- Keep it Soft: Keep the back of your neck long—don’t crane your head back. Most importantly, keep your hips and the tops of your feet grounded. You don’t need to push yourself high; the goal is comfort and a subtle muscle engagement.
- Breathe and Rest: This is a fantastic pose to hold. Breathe deeply for 30 seconds to a full minute, allowing your weight to be supported by your forearms.
Important Modification/Prop Tip:
If this is too much for your lower back, move your elbows slightly forward (away from your shoulders). This decreases the curve in your lower back. If it feels fine, try gently engaging your glutes (buttocks) to better support your pelvis.
Crucial Safety/Avoid If:
Avoid this pose entirely if you have a significant abdominal injury or are in the final stages of pregnancy. If you have a known severe disc issue, check with a professional first, though this pose is often prescribed for disc-related pain.
5. Bridge Pose (Setu Bandhasana) – The Glute Activator & Core Stabilizer
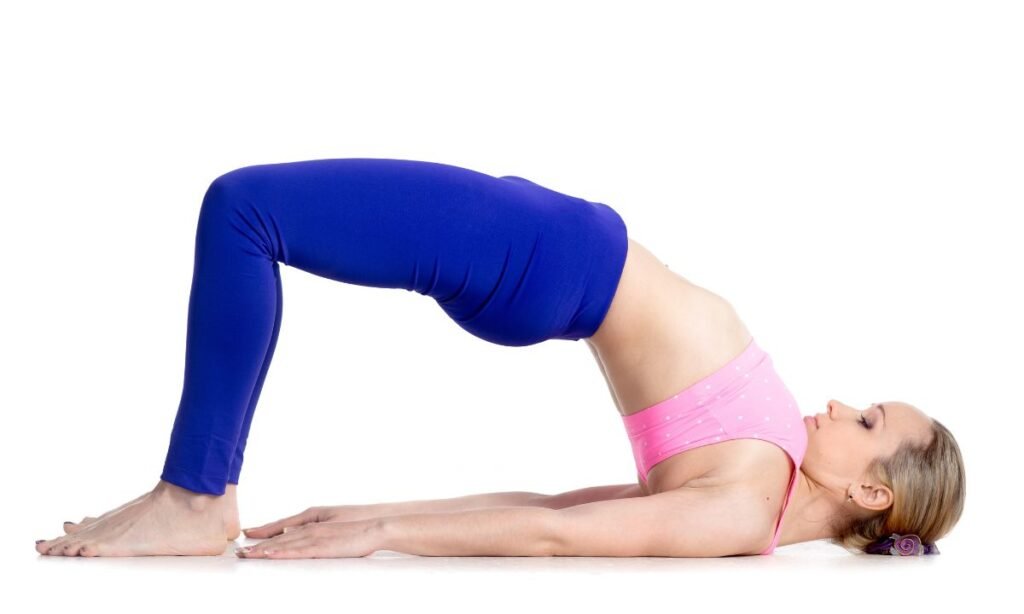
Remember how we talked about the “sleepy core muscles”? The glutes (your butt muscles) are the biggest, most powerful muscles that support your lower back, but they often forget to turn on. Bridge Pose is your glute-awakening alarm clock, and a fantastic, supported way to strengthen the entire posterior chain.
Why This Pose Works:
Bridge Pose safely strengthens the glutes, hamstrings, and the deep core muscles. When these muscles are strong, they stabilize the pelvis, which reduces the undue strain and stress placed on the lower back. It also offers a mild, supported back extension, which helps to counteract the forward-folding we do all day long.
Step-by-Step Instructions:
- Lie on your back: Bend your knees and place your feet flat on the floor, hip-width apart. Your heels should be close enough to your buttocks that your fingertips can graze them (or close to it). Keep your arms long alongside your body.
- Press and Lift: On an exhale, press firmly into your feet. Squeeze your glutes and slowly lift your hips off the mat.
- Keep it Gentle: Lift only as high as feels comfortable. Avoid arching your back forcefully. The effort should come from your legs and glutes, not your lower back. Keep your knees tracking directly over your ankles—don’t let them splay out wide.
- Hold and Activate: Squeeze those glutes! Imagine you are gently drawing your tailbone towards your knees. Hold this active position for 5 to 10 breaths, feeling the strength in the back of your body.
- Release Slow: On an exhale, slowly lower your spine back down to the mat, one vertebra at a time, until your hips rest on the floor.
Important Modification/Prop Tip:
If you want a more restorative, passive experience, place a yoga block (or a very firm cushion) under your sacrum (the flat bone at the base of your spine) and just rest your weight on it. This allows your spine to lengthen and your core to relax, which is wonderfully de-stressing.
Crucial Safety/Avoid If:
If you have a neck injury, be extremely careful not to turn your head from side to side while in the pose. The head should stay grounded and neutral.
6. Supine Spinal Twist (Supta Matsyendrasana) – The Daily De-Stresser

Spinal twists are amazing for relieving general lower back tension, especially after a long day of sitting. They gently “wring out” the spine, which can release tension, improve digestion, and reset your posture.
Why This Pose Works:
Twisting movements stretch the paraspinal muscles, the obliques, and the deeper core muscles. This action can relieve pressure and help re-align the smaller joints of the spine. The supine (lying down) position ensures the twist is supported, safe, and controlled, preventing you from pushing too far.
Step-by-Step Instructions:
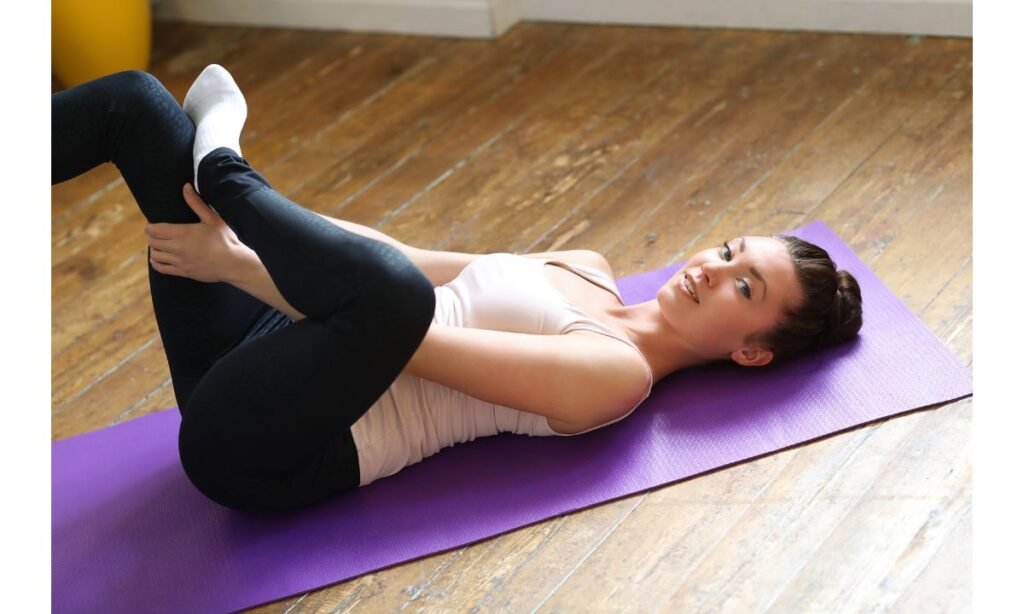
- Lie on your back: Hug both of your knees into your chest for a moment (Apanasana – a great little back relief pose itself!).
- Extend One Leg: Extend your left leg long on the mat, and keep your right knee hugged to your chest.
- Cross Over: Use your left hand to gently guide your right knee across your body toward the floor on the left side.
- The Counter-Stretch: Extend your right arm out to the side, T-shape, and gaze over your right shoulder.
- Anchor Your Shoulder: The most important part: Focus on keeping your right shoulder grounded, even if your knee doesn’t touch the floor. Let the knee hang wherever it naturally lands. The true stretch is in the gentle rotation of the spine, not the depth of the knee drop.
- Hold and Melt: Hold for 5 to 10 deep, slow breaths, using each exhale to gently let your body melt deeper into the twist.
- Switch Sides: Slowly roll back to center, hug the knee to your chest again, and repeat the entire sequence on the opposite side.
Important Modification/Prop Tip:
If your knee is floating far from the floor, place a blanket, pillow, or yoga block under the knee to support it. This allows your muscles to truly relax into the stretch.
Crucial Safety/Avoid If:
If you have a known severe or acute disc injury, you must avoid twisting! In this case, stick to gentle back-strengthening and non-twisting stretches only.
7. Reclined Half Pigeon Pose (Supta Kapotasana) – The Hip Hero
As we discussed, tight hips are a primary cause of lower back pain, as they pull the pelvis out of alignment. This reclined version of Pigeon Pose is a game-changer because it offers a deep, targeted hip stretch while the back remains completely supported and safe on the floor.
Why This Pose Works:
This pose targets the deep external rotators of the hip (piriformis and gluteal muscles). Tightness in the piriformis is a common cause of sciatica-like pain, as the sciatic nerve can run through or under this muscle. A gentle stretch here releases the tension that pulls on the sacrum, which is a common source of chronic, nagging low back pain.
Step-by-Step Instructions:
- Lie on your back: Bend your knees and place your feet flat on the floor.
- Figure-Four Shape: Cross your right ankle over your left thigh, just above the knee. Flex your right foot (pull your toes back toward your shin) to protect your knee joint.
- Hug It In: Gently lift your left foot off the floor. Thread your right arm through the space between your legs and your left arm around the outside of your left thigh. Clasp your hands behind your left hamstring.
- Draw and Release: Gently draw your left thigh toward your chest. You will feel a deep, delicious stretch in your right hip and glute.
- Relax Your Shoulders: Ensure your head, neck, and shoulders stay completely relaxed on the floor. You are only pulling with your arms to deepen the stretch, while the rest of your body stays heavy.
- Hold and Breathe: Hold this deep stretch for 5 to 10 breaths. The longer you hold it, the more the hip muscles will soften and release.
- Switch Sides: Release your hands, place your left foot down, uncross the legs, and repeat on the opposite side.
Important Modification/Prop Tip:
If you can’t reach your hands around your left hamstring, use a yoga strap, belt, or even a towel looped around your thigh to help you draw it in. This gives you extra length and leverage. If the stretch is too intense, simply keep your left foot on the floor and gently press your right knee away from your chest.
Crucial Safety/Avoid If:
If you have a severe, acute knee injury, you must proceed with extreme caution or skip this pose, as it puts pressure on the knee joint. Remember to keep that front foot flexed!
Section 4: The Mindset of a Pain-Free Practice
Getting relief from chronic back pain isn’t just about the poses; it’s about the consistency and the attitude you bring to the mat. These final tips will make your practice truly transformative and lasting.
Commit to Consistency, Not Intensity
- Little and Often is Everything: Don’t wait for a huge block of time. A 10-minute sequence done every single day will deliver more results than an hour-long session done once a month. Think of your spine as a squeaky wheel that needs daily oiling.
- Don’t Chase the “Deepest” Stretch: Yoga for pain relief is not a competition. The most helpful position for your back is the one where you feel a therapeutic stretch (a 5/10 on the discomfort scale), not pain (7/10 or more). If you push into sharp pain, your muscles will defensively tighten up, defeating the entire purpose.
- The Power of the Breath: The deepest, most therapeutic aspect of yoga is the breath. When you are in a pose, focus on long, slow inhales and even longer, slower exhales. This signals to your nervous system: “You are safe. You can relax.” If you catch yourself holding your breath, back off the stretch.
Mastering the Art of Listening
- Tune In, Don’t Tune Out: Use your time on the mat to actually check in with your body. Where is the tension hiding today? Is your neck tight? Are your feet gripping the floor? This mindful awareness is how you learn to correct poor posture before it becomes painful.
- Props Are Your Friends: Forget the idea that using a block or a blanket is “cheating.” In therapeutic yoga, props are essential tools that allow your body to achieve the correct alignment without straining, which is the fastest way to relief and long-term strength. Use them liberally to ensure your back is supported.
- End with a Rest: Always, always finish your practice with a few minutes lying flat on your back (Savasana). Just lie there, let your body absorb the work you’ve done, and let your spine settle into its new, happier alignment. This final rest is non-negotiable for integrating the benefits.
Conclusion: Taking Control of Your Back Health
You hold the power to change your relationship with back pain. The aches and spasms that have dictated your life do not have to be your permanent reality.
Yoga offers a path back to a resilient, strong, and flexible body. It replaces stiffness with fluidity, weakness with foundational strength, and stress with calm, mindful awareness.
Start small. Choose two or three poses from this list and commit to doing them today. Roll out the mat, take a deep breath, and remember that with every gentle stretch and mindful movement, you are building a stronger, happier, and pain-free spine, one breath at a time.
Your back will thank you.

Theo is a dedicated yoga instructor with over six years of experience guiding individuals toward balance, strength, and inner peace through the transformative practice of yoga.As the founder of Pure Yoga Vibes, Theo offers expert insights, inspiring routines, and a wealth of knowledge to support your wellness journey. Committed to fostering a space for growth and mindfulness, Theo’s mission is to make yoga accessible, enjoyable, and meaningful for everyone.
For inquiries or collaborations, feel free to reach out at contact@pureyogavibes.com.