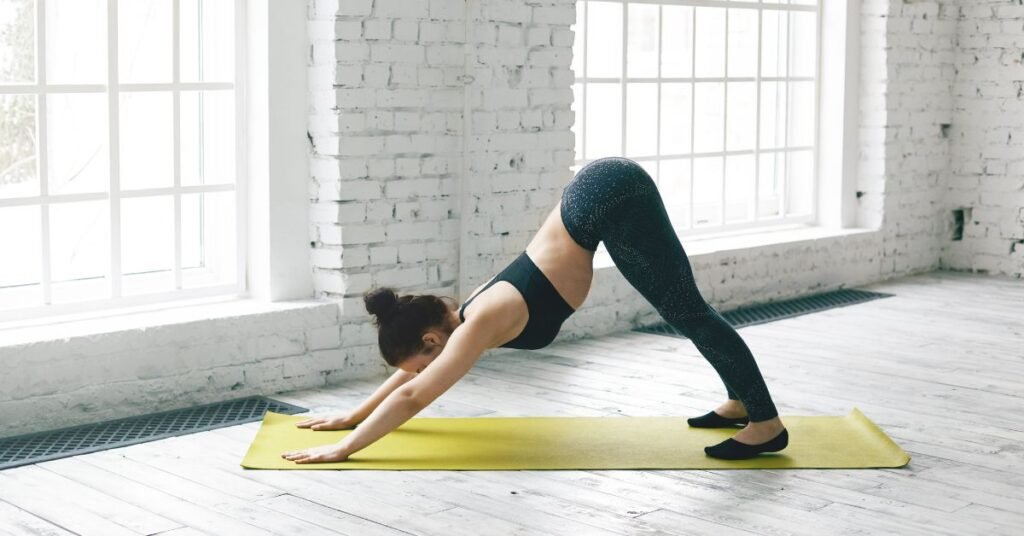
Hello, fellow humans! If you’ve ever stepped onto a yoga mat, chances are you’ve spent a lot of time in a pose that looks suspiciously like a dog stretching after a long nap: Downward-Facing Dog, or as the cool kids (and Sanskrit experts) call it, Adho Mukha Svanasana.
It’s arguably the most famous yoga pose out there, the one you see on all the merchandise. It’s a staple, a rest pose, a transition, and a strength builder all rolled into one amazing, upside-down “V” shape.
But let’s be honest: just because it’s common doesn’t mean it’s easy.
For something that looks so simple—hands and feet on the floor, hips in the air—Downward Dog can feel like a lot of work. It can stress your wrists, make your hamstrings scream, and leave you wondering if your yoga teacher secretly wants you to join the circus.
Ever felt like you’re just pushing yourself into an awkward hump instead of finding that sweet, delicious, full-body stretch? You’re definitely not alone.
I’m here to tell you that the perfect Downward Dog isn’t about looking a certain way; it’s about feeling the right way. It’s about finding an alignment that respects your unique body, brings strength, and offers that incredible lengthening relief for your spine.
This isn’t a quick-fix guide. This is a deep dive—a genuine, human-to-human exploration of this foundational pose. We’ll break it down piece by piece, address those tricky bits, laugh at our inevitable struggles, and make this pose work for you. By the time we’re done, you’ll be able to step into your Downward Dog with confidence, stability, and maybe even a little bit of joy.
Ready to roll out your mat and stop fighting this incredible pose? Let’s get started on your journey to a happier Downward Dog!
🌟 Why Bother with the “Dog”? The Benefits of Downward-Facing Dog
Before we dive into the nitty-gritty of alignment, let’s take a moment to appreciate why we spend so much time in this pose. It’s not just a fancy way to get from the front to the back of your mat!
Adho Mukha Svanasana is a truly full-body experience. It’s an inversion (because your head is below your heart), a forward fold, a stretch, and a strengthener. Think of it as your body’s multi-tasking superhero pose.
- 🤸♀️ Full-Body Flexibility and Stretch: This is the big one. Down Dog gives a deep, satisfying stretch to your hamstrings (the back of your thighs), calves, and the entire length of your spine. It’s a lifesaver if you spend a lot of time sitting.
- 💪 Serious Strength Building: Don’t let the “rest pose” label fool you. You are actively holding up your body! This pose strengthens your arms, shoulders, wrists, and even your abdominal muscles (your core).
- 🧠 A Boost for Your Brain and Mood: Because your heart is higher than your head, it’s a mild inversion. This simple shift helps increase blood flow to your brain, which can help calm your nervous system, relieve mild stress and anxiety, and even give you a little energy lift. Hello, mental clarity!
- 🦴 Spinal Decompression: When you push your hips up and back, you create length in your spine. This is a beautiful way to counteract the compression and slouching that happens from daily life. It’s like giving your vertebrae a little vacation!
- ❤️ Improved Circulation: The inverted nature encourages blood to flow more freely, which is excellent for overall circulation and a feeling of revitalization.
It truly is a magnificent pose, but to reap these rewards, we have to make sure we’re not just hanging out but are actively engaging and aligning our bodies correctly. That’s where the fun (and the fine-tuning) begins!
📐 The Foundational Blueprint: Setting Up Your Downward Dog
The biggest mistake people make? Starting in the wrong place! The distance between your hands and feet is everything. Too close, and you’re in a painful squat. Too far, and you’re in a wobbly plank.
Here is the most reliable way to find your perfect Down Dog stance:
Step 1: Start in Tabletop Pose
- Knees and Hands: Begin on your hands and knees. Your knees should be directly underneath your hips.
- Hand Position: Place your hands shoulder-width apart, or maybe just a little wider—whatever feels best. Spread your fingers wide like starfish and press down firmly into the base of your knuckles, especially the area between your thumb and index finger. This is your primary anchor and will protect your wrists. Your wrist creases should be parallel to the front of your mat.
Step 2: Measure Your Distance with Plank Pose
- The Best Trick: From Tabletop, step your feet back into a Plank Pose (like the top of a push-up).
- In Plank, your shoulders should be stacked right over your wrists, and your body should form one long, straight line from head to heels.
- The Golden Rule: This is the correct distance between your hands and feet! Do not move your hands or your feet from this spot.
Step 3: Lift Off!
- Tuck and Lift: Keeping your hands and feet exactly where they are, tuck your toes under. On an exhale, press into your hands and lift your hips high and back toward the ceiling.
- The Upside-Down V: You’ve now created that famous upside-down “V” shape. Your head hangs heavy between your upper arms—no need to look forward or tuck your chin. Relax your neck!
🛠️ Deep Dive into Alignment: How to Fine-Tune Your Pose
Now that you’ve found your “V,” it’s time to refine the pose. Remember, this isn’t about perfect—it’s about safe and effective.
✋ Your Hands and Arms: The Mighty Pillars
We put a lot of weight here, so getting this right is crucial for happy wrists and shoulders.
- Root Down: Press down through your entire palm, but focus that energy into the first knuckle of your index finger and your thumb. This action creates a slight lift in the center of your palm, taking pressure out of your wrist joints.
- Arm Rotation: This is subtle but powerful. Think about rotating your inner elbows toward the front of your mat (like you’re trying to hide your armpits). This is called external rotation in the shoulders. It broadens your upper back and helps keep your shoulders away from your ears.
- No Chicken Wings: Keep a micro-bend in your elbows. This prevents you from “locking out” or hyperextending the joint, which is a common cause of elbow pain.
🧘♀️ Your Spine and Torso: Length is the Goal
This is where many people get confused, prioritizing straight legs over a straight spine. The spine is always the priority!
- Lift the Tail: Imagine a gentle puppet string attached to your tailbone, pulling your hips high and back toward the corner where the wall meets the ceiling. This helps to lengthen your spine.
- The Magic of Bent Knees: If your hamstrings feel tight and your back is rounding (like a cat), bend your knees generously! Don’t be shy. Bending your knees allows you to tilt your pelvis forward and truly lengthen your spine. This is a sign of a smart yogi, not a weak one.
- Ribcage Check: Draw your lower ribs in towards your spine. Sometimes, beginners let their belly hang and their lower back arch excessively (a “banana back”). A little core engagement helps keep your torso stable and prevents this hyper-extension.
🦵 Your Legs and Feet: Grounding and Stretching
The lower body provides the foundation for the stretch.
- Foot Placement: Your feet should be about hip-width apart, maybe a little wider. Point your toes straight ahead. Check to see if you can see your heels peeking out from behind your ankles—if you can, try to internally rotate your thighs slightly until the outside edges of your feet are parallel to the sides of your mat.
- Heels vs. Floor: Don’t obsess over getting your heels to the floor! Seriously, give yourself a break on this one. For many people, due to tight calves or hamstrings, the heels will never touch. It does not matter! What matters is maintaining the length in your spine. If your heels lift, that’s fine. If they touch, that’s fine, too!
- Engage Your Thighs: Draw your kneecaps up slightly by engaging your quadriceps (the muscles on the front of your thighs). This action helps protect your knee joints and deepens the stretch in your hamstrings.
🛑 Stop Doing That! 5 Common Downward Dog Mistakes
It’s completely normal to feel a bit awkward when you first try this pose. Our bodies aren’t used to this shape! Here are the most common things people do wrong—and simple fixes to get back on track.
1. The “Saggy Hammock” Back (or “Rounded Cat” Back)
- The Mistake: Your back is either excessively arched in your lower spine, causing your belly to droop (Saggy Hammock), or it’s rounded and hunched in your upper back (Rounded Cat).
- The Problem: Both errors compress your spine and shift too much weight into your arms and wrists, which can lead to pain.
- The Fix: Bend your knees! Seriously, bend them a lot. Prioritize a long, straight line from your wrists all the way up to your hips. Once your back is straight, then you can work on slowly straightening your legs. If your back rounds again, go back to bending your knees.
2. The “Hand-Walker” Pose
- The Mistake: Your hands and feet are too close together, making the pose look more like a little hop or a simple forward fold.
- The Problem: This short stance prevents you from getting the full length in your spine and puts excessive pressure on your shoulders.
- The Fix: Re-measure! Get back down to your hands and knees, find your Plank Pose, and don’t move your hands or feet when you lift up. Your body needs space to create that long, diagonal line.
3. The “Clenched Fist” Hands
- The Mistake: You press all your weight into the heels of your hands, or you lift up your fingers and grip the mat like you’re trying to climb a wall.
- The Problem: This is a one-way ticket to wrist pain and strain because you aren’t distributing your body weight properly.
- The Fix: Spread your fingers wide! This is a non-negotiable step. Press into the entire perimeter of your hand, focusing especially on the knuckles of your index finger and thumb. Rooting down through your hands is like widening the foundation of a house—it makes the whole structure more stable.
4. The “Head-Dropper” or “Head-Lifter” Neck
- The Mistake: You let your head simply dangle, forcing your neck to crunch down into your shoulders, or you look forward between your hands, cranking your neck up.
- The Problem: Both put unnecessary strain on your neck and cervical spine.
- The Fix: Keep your neck in line with the rest of your spine. Your ears should be roughly in line with your upper arms. Look gently toward your navel or your thighs. The goal is to keep the neck relaxed but supported.
5. The “Locked-Out” Knees and Elbows
- The Mistake: You aggressively straighten your arms and legs until the joints are locked and rigid.
- The Problem: This puts undue stress on your joints, potentially damaging connective tissue, and disengages the muscles that should be doing the work.
- The Fix: Introduce a “micro-bend” to your knees and elbows. Just a tiny, tiny softness. It’s a subtle action, but it tells your muscles, “Hey, you’re in charge now!” and protects your joints.
🪜 Modifications and Props: Making Downward Dog Accessible to Every Body
Remember, yoga is for you, not the other way around. If the standard pose feels uncomfortable, that means you’re doing it wrong for your body right now. The key to a sustainable practice is learning how to modify.
🧘♀️ For Tight Hamstrings or Back Pain:
- Deep Knee Bend: This is your best friend. Bend your knees so much that your belly almost rests on your thighs. This allows your spine to lengthen fully without the pull of tight hamstrings rounding your back. You can keep a deep bend the whole time—it’s a perfect Downward Dog!
- High Heels: Allow your heels to lift high off the floor, balancing on the balls of your feet. As you exhale, simply let them soften toward the floor without forcing them. This takes pressure out of the back of the leg.
🖐️ For Wrist Pain or Injury:
- Use Blocks: Place a yoga block under each hand. This elevates your hands and slightly changes the angle of your wrist joint, reducing the intensity of the bend and the pressure.
- Forearm Dog (Dolphin Pose): This is a fantastic alternative. Lower onto your forearms, keeping your elbows shoulder-width apart. Spread your fingers and keep your hips high. This shifts the weight to your strongest joint—the elbow—and gives you all the benefits of the spinal length and hamstring stretch.
- Wall Dog: Stand facing a wall, about 3-4 feet away. Place your hands on the wall at hip height and walk your feet back, bending at the hips until your arms are straight and parallel to the floor. You create the “V” shape using the wall for support, which is zero pressure on the wrists!
🌬️ For When You Need a True Rest:
- Child’s Pose (Balasana): When your teacher calls for Downward Dog, and you feel tired, just drop to your knees. Separate your knees wide or keep them together, and fold forward, resting your forehead on the mat. You’re still on the mat, you’re still practicing, and you’re giving your body the rest it needs. Zero judgment.
💭 The Philosophy of the Pose: Beyond the Body
It’s easy to focus only on the physical shape, but Downward Dog is a powerful mental pose, too.
In many yoga styles, Down Dog is a resting pose. I know, I know—it feels like a workout! But when you find your correct alignment, you’re creating a balanced, stable shape that should feel sustainable. You are both strengthening and stretching at the same time.
It teaches us:
- To Find Stillness in Activity: Your muscles are working, but your mind should be calm. Can you maintain a steady, deep breath even when your body is engaged?
- To Listen to Your Body: This pose is the ultimate alignment check. Your tightness in your hamstrings tells you to bend your knees. Your wrist pain tells you to spread your fingers and shift your weight back. It forces you to pause and ask, “What does my body need right now?”
- To Embrace Imperfection: Your Down Dog will look different every day, even every hour. Some days your heels might be closer to the ground, and other days, they might be miles away. That’s human. Embrace the journey of discovery, not the destination of heel-to-floor perfection.
✍️ A Personal Note on Consistency (and Humor)
My first Downward Dog was a disaster. I remember feeling like my wrists were going to explode, and my butt was just… somewhere in the air, but definitely not high enough. I thought my yoga teacher was a sadist for calling it a “rest pose.” I literally used to hide in Child’s Pose the second I heard “Adho Mukha Svanasana.
What changed? Consistency and kindness.
I stopped trying to look like the skinny girl on the poster. I started bending my knees more. I focused on pressing through my knuckles until my hands ached a little less. I realized that the stretch isn’t a violent tug-of-war; it’s a gentle, patient opening.
If you feel frustrated, take a break. Seriously. Drop to Child’s Pose. Come back and try one adjustment at a time. The next time you’re on your mat, don’t worry about all the steps at once. Just choose one thing to focus on:
- Today, I will focus on spreading my fingers.
- Tomorrow, I will focus on bending my knees.
- The day after, I will focus on not looking at my hands.
Yoga, and Downward Dog especially, is not a sprint. It’s a lifelong, beautifully messy practice. Be patient, be kind to yourself, and remember, no matter how bad you think you look, you are absolutely magnificent for showing up.
Woof.
🗓️ Your Downward Dog Maintenance Plan
You’re a Down Dog master now! But true mastery is about maintenance. Use these simple ideas to keep your pose feeling fresh and effective:
- Prep Poses: Always warm up! Try a few rounds of Cat/Cow Pose (rounding and arching your spine on hands and knees) and Puppy Pose (like Down Dog, but your knees stay on the floor) before your first full Down Dog.
- Walk Your Dog: Before settling into the pose, “walk your dog.” Bend one knee deeply while pushing the opposite heel toward the floor, then switch sides. This gentle movement is an excellent way to warm up your calves and hamstrings.
- Check In Often: During your practice, don’t just rush through Down Dog. When you enter the pose, take an extra breath to check your alignment: Hands? (Wide fingers, pressed knuckles) Spine? (Long, knees bent if needed) Neck? (Relaxed).
- Use a Mirror or Video: Occasionally practice facing a mirror or record yourself with your phone. Seeing what you’re actually doing can be an eye-opener and help you catch those common mistakes we discussed!
🎉 Conclusion: Embrace Your Inner Stretchy Dog
You’ve just absorbed over 3,000 words of wisdom on one single yoga pose! That’s how foundational and complex Adho Mukha Svanasana truly is.
If you take only three things away from this comprehensive guide, let them be:
- Prioritize Your Spine: Bend your knees if your back is rounding. A long, straight spine is more important than straight legs.
- Protect Your Wrists: Spread your fingers wide and press into your knuckles to take the pressure out of the heel of your hand.
- Be Patient: Your body changes daily. Be kind and listen to what it needs.
Downward-Facing Dog is your home base, your reset button, and your whole-body check-in. It asks you to be strong, flexible, and utterly present. It’s a challenge and a reward all at once.
So, the next time you hear that familiar cue in class, take a deep breath, spread your fingers, and lift your hips high and back. You know exactly what you’re doing now. You’ve got this!
Theo is a dedicated yoga instructor with over six years of experience guiding individuals toward balance, strength, and inner peace through the transformative practice of yoga.As the founder of Pure Yoga Vibes, Theo offers expert insights, inspiring routines, and a wealth of knowledge to support your wellness journey. Committed to fostering a space for growth and mindfulness, Theo’s mission is to make yoga accessible, enjoyable, and meaningful for everyone.
For inquiries or collaborations, feel free to reach out at contact@pureyogavibes.com.