The Wobble is Normal, The Fall is Optional: Find Your Inner Stillness
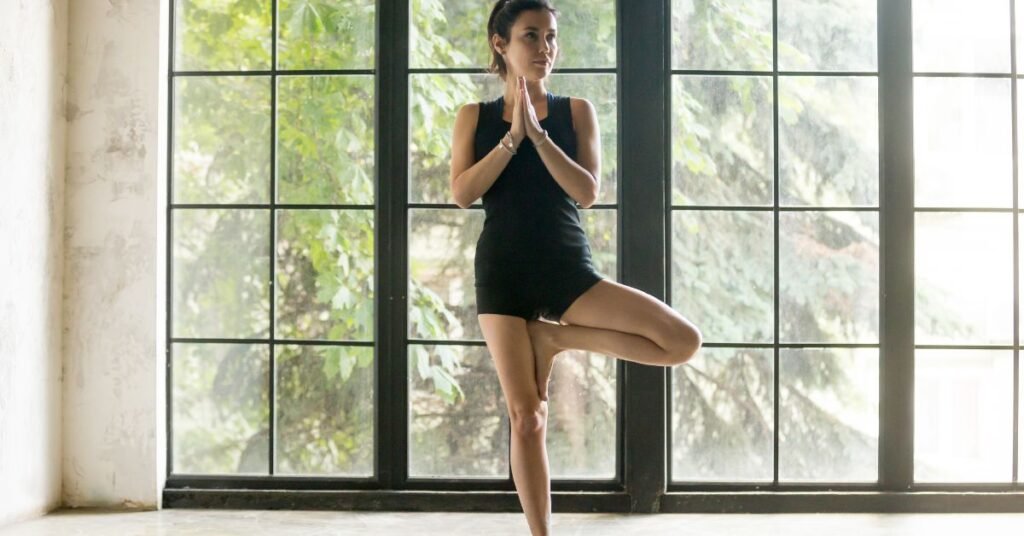
Hello, fellow human! Have you ever looked at a beautifully poised person holding Tree Pose (Vrikshasana) in a yoga class or on social media and thought, “Wow, I wish I could do that without looking like a drunken flamingo?” Trust me, you are not alone.
Tree Pose is one of the most recognizable and, frankly, most frustrating poses in yoga. It looks deceptively simple: stand on one leg, lift the other foot, and raise your arms. Easy, right?
Then you try it. And suddenly, you’re a ship on a stormy sea, swaying, wobbling, and maybe even taking a tumble. It’s enough to make you give up on balance poses entirely.
But here’s the secret that experienced yogis know: Tree Pose is less about perfect stillness and more about finding your personal center and learning to gracefully recover from the wobble. It is a moving meditation that teaches you how to plant your roots—literally and metaphorically—so you can weather any storm.
This isn’t just a list of steps. This is a complete, human-friendly guide born from years on the mat. We’re going to cover everything: the physical setup, the mental game, the why behind the wobbly moments, and the simple tricks that turn you from a flimsy sapling into a strong, magnificent oak.
Are you ready to stop tipping over and start growing stronger from the ground up? Let’s begin!
🌳 The Essential Benefits of Vrikshasana: Why Bother Balancing?
Before we even put a foot up, let’s talk about the incredible return on investment you get from practicing this pose. It’s not just a cool party trick; it’s deep work for your body and your mind.
💪 Physical Strength and Stability
- Ankle & Leg Power: You are literally strengthening all the tiny stabilizing muscles in your standing ankle, foot, calf, and thigh. This is crucial for injury prevention in daily life.
- Core Engagement: Your core—all the muscles in your abdomen and lower back—has to switch on to keep your hips level and your torso upright. This is natural core training.
- Hip Opening: The placement of your lifted foot gently opens your hip flexor and groin, improving your overall hip mobility.
- Improved Posture: When you’re focused on standing tall, you naturally lengthen your spine and draw your shoulder blades back. Say goodbye to the slump!
🧠 Mental Calm and Focus (The Meditation Part)
- Enhanced Concentration: You simply cannot do this pose while planning your grocery list or replaying that awkward thing you said yesterday. Tree Pose demands your full, undivided attention. That forced focus is a powerful mental break.
- Stress Reduction: The combination of focused breathing and concentration calms the nervous system, acting like a little reset button for your brain.
- Mind-Body Connection: It drastically improves proprioception (your body’s awareness of where it is in space). The more you practice, the smarter your body becomes at catching itself before a fall.
🧭 The Step-by-Step Guide: Building Your Tree from the Roots Up
Forget the rush. The real power of Tree Pose is in the setup. We’re going to move slowly and mindfully through the foundation.
Step 1: Establishing a Mountain Foundation (Tadasana)
Think of this as your starting line. You can’t build a balanced tree on a shaky plot of land.
- Stand Tall: Begin at the top of your mat with your feet together (or hip-width apart if that’s better for your body).
- Root Down: Key Human Element: Take a moment to lift all ten toes, spread them wide, and then set them back down softly. Feel the four corners of your feet (big toe mound, pinky toe mound, outer heel, inner heel) pressing evenly into the ground.
- Find Your Center: Gently tuck your tailbone down slightly to lengthen your lower back (don’t clench your glutes!). Pull your belly button softly towards your spine. Shoulders back and down. You should feel solid.
Step 2: Choosing Your Spot (Finding Your Drishti)
Before you lift a single toe, pick your Drishti. This is a Sanskrit word for a focused gaze—a single, unmoving point on the floor or wall directly in front of you.
- The Golden Rule: If your eyes wander, your balance follows. Stare at your chosen spot like it holds the winning lottery numbers.
Step 3: Shifting Weight and The Gentle Lift
Now, the dance begins.
- Shift Your Weight: Slowly, gently, transfer all your weight onto your left foot (the standing leg). Imagine your left leg is a post sinking deep into wet cement.
- Activate: Engage the quadriceps (thigh muscle) of your standing leg. Put a micro-bend in the knee—a tiny, almost imperceptible bend. Never lock your knee—it puts stress on the joint and shuts off your essential stabilizing muscles.
- The Flap: Lift your right foot just enough to clear the floor. It’s okay if your knee bends out slightly. You’re testing the water.
Step 4: Placing the Foot (The Most Important Choice)
This is where many beginners try to rush and end up frustrated. You have three main, perfectly valid options for where to place your lifted foot. The goal is to avoid the knee joint entirely.
| Option | Placement Location | Benefit | Who It’s For |
| Kickstand | Inner Ankle/Calf. The heel rests near the ankle, the toes remain on the floor. | Maximum stability and balance support. The best place to start. | Beginners, anyone needing extra stability, practicing on a wobbly surface. |
| Mid-Level | Inner Calf. Just below the knee. Lift your foot with your hand and press the sole into your inner calf. | Increased challenge, greater leg engagement. | Practitioners with developing balance. |
| Full Pose | Inner Thigh/Groin. Use your hand to guide the sole of your foot high up, pressing it into your inner thigh. | Maximum expression of the pose, deeper hip stretch. | Those with consistent balance and openness. |
- Crucial Alignment Note: Wherever you place the foot, use your hand to ensure your bent knee is pointing out to the side, opening the hip. Then, actively press the sole of your foot into your standing leg, and press the standing leg back into your foot. This creates the resistance that keeps you stable.
Step 5: Finding Your Branches (Arm Variations)
You’re balanced! Congratulations. Now, it’s time to raise your branches.
- Option 1 (The Stable Base): Bring your hands to heart center in Anjali Mudra (prayer position). This is the least disruptive to your balance.
- Option 2 (The Reach): Slowly inhale and extend your arms out and up over your head. You can keep them shoulder-width apart, or bring the palms to touch. Let your shoulders relax away from your ears.
Step 6: Holding the Pose & The Exit
You are a magnificent, rooted tree.
- Breathe: Take 5 to 10 deep, slow breaths. Every inhale, grow taller. Every exhale, root deeper into the standing foot.
- Release: When you’re ready to come out, slowly bring your hands back down to heart center. Use your hand to gently guide your lifted foot back down to the floor, coming back to your Mountain Foundation.
- Shake it Out: Do a little jig! Wiggle your toes, shake your standing leg, and notice the difference between the grounded leg and the one you just used.
- Repeat on the other side. (Don’t skip it! We all have a favorite side, and this is how you even things out.)
😩 The Most Common Mistakes (and How to Fix Them)
It’s not a mistake if you learn from it! These are the little a-ha! moments that will transform your pose.
🛑 Mistake #1: Placing the Foot on the Knee Joint
- The Problem: The knee joint is a hinge, not a ball-and-socket. Pressing your foot directly against it destabilizes the joint and can cause unnecessary strain or even injury.
- The Fix: Always go above or below the knee. If your foot is slipping down from the inner thigh, the mid-calf is your safe zone. Embrace the kickstand if you need to!
🛑 Mistake #2: The Hip-Pop or “Silly Walk” Hip
- The Problem: When we shift weight to one leg, it’s very common to let the standing hip jut out to the side. You look like you’re waiting for a bus that’s never coming. This puts uneven pressure on your lower back.
- The Fix: Imagine your hips are headlights on a car—they should be shining straight forward. Pull your standing hip in and up so your pelvis is level and square to the front of your mat.
🛑 Mistake #3: Death Grip on the Floor (Clenched Toes)
- The Problem: Trying to “grip” the floor with your toes is a panic response. It actually makes you more unstable and tires out your foot muscles fast.
- The Fix: Spread your toes wide, but keep your grip gentle. Instead of grabbing the floor, focus your energy on the four corners of your foot rooting down, especially the big toe mound. Think of your foot as a suction cup, not a claw.
🛑 Mistake #4: Holding Your Breath (The Breathless Wobble)
- The Problem: Anytime we’re afraid of falling, we hold our breath. Holding your breath tenses your muscles and, ironically, makes the wobble worse because you lose your internal rhythm and focus.
- The Fix: Your breath is the anchor. Make your exhales long and slow. If you wobble, don’t try to muscle through it. Breathe through the wobble. The deep exhale often helps re-center your body faster than struggling to hold still.
🛠️ Modifications & Props: Your Tools for Success
A strong tree doesn’t start perfectly tall. It needs support, and that’s okay!
🌳 The Wall as a Best Friend
- How: Stand next to a wall, allowing your outer hip or shoulder to lightly touch it.
- Why: This gives you a tangible reference point for balance and a safety net to fall back on, allowing you to focus on your foot placement and spinal alignment instead of the fear of falling.
🪑 The Chair or Stool
- How: Place a hand on the back of a sturdy chair that’s next to your standing side.
- Why: This offers less support than a wall but still provides a light, active touch that frees up your standing leg to do the heavy work.
🧦 Using Your Pants (It’s Not Cheating!)
- How: If your foot slides down from your inner thigh, your clothes might be too slippery. Try using your hand to hold the ankle of the lifted foot, pressing your knee out to the side as you hold.
- Why: It keeps your hip open and teaches your body the feeling of the pose while your balance system catches up.
🧘 The Deeper Wisdom: Tree Pose for Your Life
Think about a real tree. It stands firm through storms, but it’s not rigid. It sways, bends, and yields to the wind. If it were completely stiff, the wind would snap it in two.
Your Tree Pose is the same:
- Embrace the Wobble: That shaking, the micro-adjustments in your ankle, those are your stabilizers turning on. That’s your body getting stronger and smarter. You’re not failing; you’re learning.
- Fall with Grace: If you lose your balance, simply place the foot down and try again. Don’t get angry at yourself! The fall isn’t a failure; it’s a redirection. This translates directly to life—when you stumble, don’t spiral; just step back into place and re-center.
- Consistency over Perfection: Five solid, focused breaths in a kickstand pose are infinitely more valuable than five frantic seconds in the full pose before you bail out.
Your Tree Pose Pledge
Next time you step into Tree Pose, try this little mantra in your head:
“I am rooted, but I am not rigid. I can sway with the wind and still hold my ground.”
It’s a beautiful, simple practice. It’s about finding that core strength that allows you to be both completely stable and wonderfully flexible.
Now go forth, be wobbly, be strong, and be your own magnificent tree!

Theo is a dedicated yoga instructor with over six years of experience guiding individuals toward balance, strength, and inner peace through the transformative practice of yoga.As the founder of Pure Yoga Vibes, Theo offers expert insights, inspiring routines, and a wealth of knowledge to support your wellness journey. Committed to fostering a space for growth and mindfulness, Theo’s mission is to make yoga accessible, enjoyable, and meaningful for everyone.
For inquiries or collaborations, feel free to reach out at contact@pureyogavibes.com.