The Confession We All Share: “I Can’t Do Yoga, I’m Not Flexible!”
Hello, future yogi! Let’s get something straight right now: Yoga is not about touching your toes.
I know, I know. You’ve seen the Instagram photos. The impossibly long legs folded into a perfect pretzel. The serene faces hovering inches above the ground in a beautiful, gravity-defying pose. You looked at that photo, looked at your own knees that haven’t seen your hands without a serious struggle since high school gym class, and muttered the ancient, self-defeating yoga mantra: “Nope. I can’t do that. I’m just not flexible enough.”
If that sounds like you, then pull up a chair—or better yet, a comfortable cushion—because this blog post is your official, certified, no-flexibility-required permission slip to start a yoga practice.
Seriously.
For years, the myth has persisted: yoga is only for the naturally bendy, the former gymnasts, or those blessed with rubber-band joints. But that’s like saying you can’t go to the gym unless you can already bench-press a car. It’s ridiculous! You go to the gym to get strong; you do yoga to become more flexible, more mindful, and just generally more… human in your own body.
This isn’t a post that’s going to trick you into attempting a Full Lotus Pose. Forget that noise. This is your comprehensive, easy-English, jargon-free guide to the foundation-laying, spine-loving, stress-busting yoga poses that are accessible to every single body, regardless of how tight your hamstrings are or how long you spend hunched over a laptop (which, let’s be honest, is probably too long).
What you’ll find in this super helpful, easy-to-read guide:
- The Big Mindset Shift: Why trying to look like the person next to you is the fastest way to fail at yoga.
- The Grounded & Gentle Poses: Our core list of floor-based poses that are more about comfort and rest than deep stretching.
- Standing Strong, Not Stretching Far: How to build strength and balance without straining your tight spots.
- Your Secret Toolkit: The essential props (blocks, straps, etc.) and how to use them to cheat your way to success.
- A Simple 10-Minute Routine: A quick flow to get you started immediately.
Let’s ditch the image of the human pretzel and embrace the wonderful reality: Your yoga journey begins exactly where you are right now.
Section 1: The Flexibility Myth – Why You Don’t Need to Be a Pretzel
If I could shout one thing from the rooftops, it would be this: Yoga is a practice, not a performance.
When you look at someone doing a beautiful, deep forward fold, you might think, “Wow, they are so flexible.” That’s true, but what you should be thinking is, “Wow, look at the functionality of their body.” Flexibility, in the context of yoga, isn’t about being able to bend in half—it’s about having a full, healthy range of motion in your joints so you can live your life without pain.
The True Goals of Yoga (Spoiler: It’s Not the Splits)
| Instagram Goal | Real Yoga Goal |
| Touching your toes | Loosening your lower back to reduce pain |
| Getting your knee behind your head | Finding a moment of stillness and quiet for your brain |
| Doing a perfect handstand | Building core strength and balance (and falling with grace) |
| Looking beautiful in the pose | Feeling good in your body while you are in the pose |
Your Body Doesn’t Care About Aesthetics
When a teacher says, “Fold forward,” and your hands barely reach your shins, that’s fine. Your body is communicating. It’s saying, “Hey, we’re a little tight here today! Let’s not push it, okay?” A truly helpful yoga practice respects that tightness.
Trying to force a deep stretch is not only painful, it’s counterproductive. You’re telling your muscles to panic and tighten up even more. The gentle, consistent, prop-supported modifications we’re about to cover are what actually teach your muscles to relax and eventually let go.
A Personal Story to Drive the Point Home:
I once had a student, let’s call her Carol, who was so stiff she looked like she’d been spray-painted into a pair of jeans. She refused to use props because she thought it was “cheating.” After a month of her struggling and looking miserable, I finally convinced her to put a block under her hips in a simple seated pose. The change was instant! She suddenly had the space to sit up straight, breathe easier, and finally focus on her breath instead of her pain. She cried a little (the good kind of cry). The props weren’t a sign of weakness; they were a tool for success.
The Takeaway: Leave your ego at the door. If a pose feels like a gentle stretch, you’re winning. If it feels like torture, you’re pushing too hard. It’s that simple.
Section 2: The Grounded and Gentle – Foundational Poses for the Non-Flexible
These poses are your bread and butter. They are primarily done on the floor, focus on stability and basic spinal movement, and require zero intense stretching. They are the ultimate “I’m not flexible” safe zone.
1. The Ultimate Pause Button: Child’s Pose (Balasana)
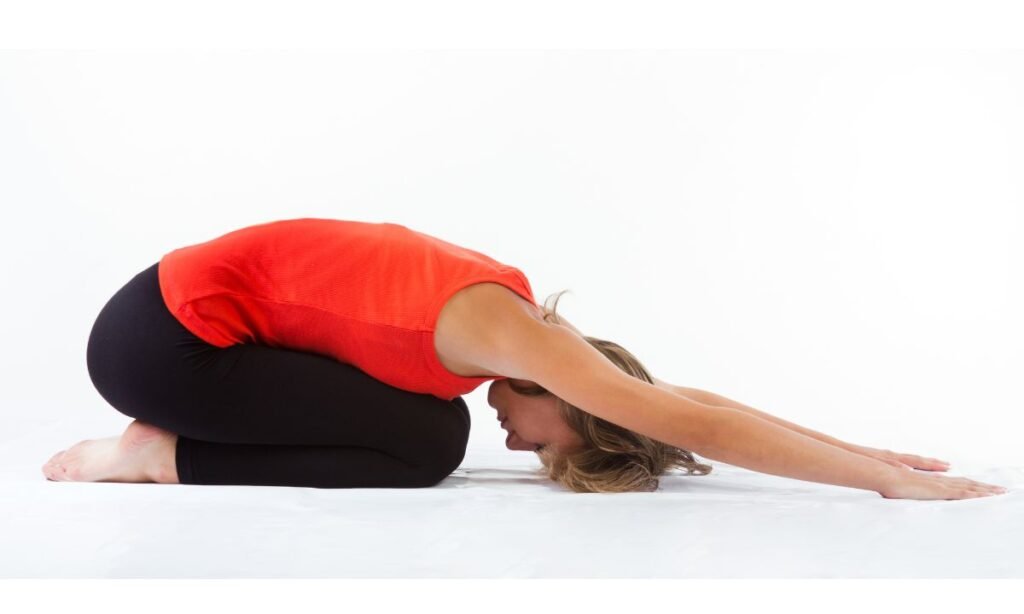
This is the anti-performance pose. If you feel tired, overwhelmed, or in pain at any point during your practice, this is your safe harbor. It is a fundamental yoga pose because it teaches us how to rest.
- The Basic Idea: Kneeling on the floor, folding your torso over your legs, and letting your head rest.
- Why It’s Great for Stiffness: It’s a passive stretch that gently decompresses the spine and provides a lovely stretch for your hips, thighs, and ankles without demanding deep flexion.
- How to Do It (The Easy Way):
- Start on your hands and knees.
- The Wide-Knee Option (Highly Recommended): Separate your knees out wide, maybe as wide as your mat, but keep your big toes touching.
- Sit your hips back toward your heels. (If your hips don’t touch your heels, that’s okay!)
- Walk your hands forward, letting your torso drop down between your thighs.
- The Pro-Tip Modification (For Tight Hips/Knees): If your head doesn’t reach the floor, stack your fists one on top of the other and rest your forehead on them. If your hips are really high off your heels, roll up a blanket or a towel and place it in the crease behind your knees for support. It’s like a little knee pillow!
- Stay Here: Breathe deeply for at least 30 seconds.
2. Spine Lubrication: Cat-Cow Pose (Marjaryasana/Bitilasana)

You know how a car needs its joints and moving parts oiled? This pose does that for your spine. It’s not a stretch; it’s a gentle, rhythmic movement that warms up the entire length of your back.
- The Basic Idea: Moving your spine between a rounded (like a Halloween cat) and an arched (like a happy cow) shape.
- Why It’s Great for Stiffness: It’s dynamic, meaning you’re moving, which is safer and often more effective than holding a static stretch. It wakes up the core muscles that support your back.
- How to Do It (The Easy Way):
- Start on your hands and knees (tabletop position). Your hands should be under your shoulders, and your knees under your hips.
- The Cow (Inhale): Drop your belly toward the floor, lift your chest, and look slightly up. This creates a gentle arch in your lower back. Don’t strain your neck.
- The Cat (Exhale): Tuck your tailbone under (imagine pulling your belly button up to the ceiling), round your back, and let your head drop (but don’t force your chin to your chest). You should feel a gentle broadening between your shoulder blades.
- Flow: Keep moving back and forth with your breath—inhale for Cow, exhale for Cat.
- The Pro-Tip Modification (For Wrist Pain): If your wrists hurt, place your hands on a pair of yoga blocks instead of the floor. This reduces the angle and the pressure. You can also turn your hands out slightly or curl your hands into fists and rest on your knuckles.
3. The Prop-Powered Lift: Supported Bridge Pose (Setu Bandhasana)
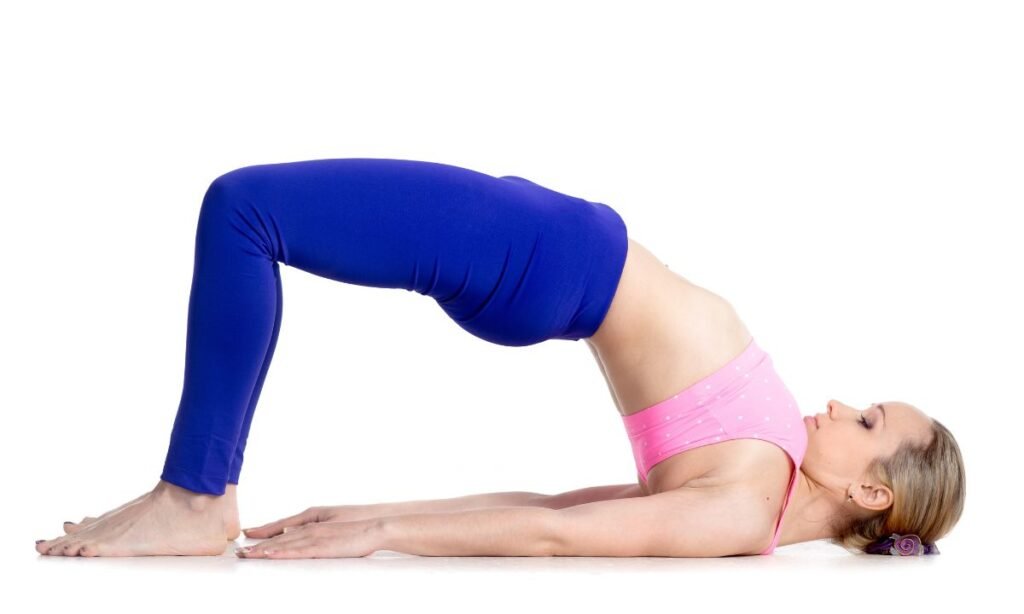
This pose gives you a gentle, therapeutic backbend and a subtle hip-flexor stretch, all while being completely supported. We’re going to use our favorite secret weapon: the yoga block.
- The Basic Idea: Lying on your back and lifting your hips up, supported by a block.
- Why It’s Great for Stiffness: It counteracts the “hunch” we get from sitting. Because the block does all the work, your muscles can relax and receive the stretch passively.
- How to Do It (The Easy Way):
- Lie down on your back with your knees bent and your feet flat on the floor, about hip-width apart. Your heels should be close enough to your fingertips to just graze them.
- Lift: Press your feet into the floor and lift your hips up slightly.
- Place the Block: Slide a yoga block (a book or a sturdy box works too, in a pinch!) under your sacrum (the flat, bony part at the very base of your spine, above your tailbone). Crucially, do NOT put it on your lower back.
- Rest: Once the block is in place, completely relax your hips onto it. You can choose the height that feels best: the lowest setting is great for a subtle stretch; the middle setting is a bit more intense.
- Stay Here: Let gravity take over. Allow your front body (chest and abdomen) to open gently. This is incredibly restorative.
- To Come Out: Press your feet down, lift your hips slightly, slide the block out, and gently lower your tailbone back to the floor. Hug your knees to your chest.
4. The Spine Wringer: Reclined Spinal Twist (Supta Matsyendrasana)

This is the closest thing you’ll get to a massage without booking an appointment. It’s fantastic for releasing tension across your lower back and is easily customized for any level of flexibility.
- The Basic Idea: Lying on your back and gently letting your knees fall to one side while your upper body stays grounded.
- Why It’s Great for Stiffness: Twists are incredible for spinal health. They increase blood flow and release tension. Because you’re lying down, you have full control and can use gravity to your advantage without straining.
- How to Do It (The Easy Way):
- Lie flat on your back and hug both knees into your chest.
- Extend your arms out to a “T” shape on the floor (palms facing up or down).
- The Twist: On an exhale, let both knees gently drop over to the right side. Crucially, they don’t have to touch the floor!
- The Head: Turn your head to the left, looking over the opposite shoulder.
- The Pro-Tip Modification (For Tight Backs): If your knees are hanging way up in the air, or if it feels too intense, place a yoga block or a pillow under your top knee to give it support. This removes the strain and lets your lower back truly relax. If your opposite shoulder pops up too much, don’t worry about it—focus on relaxing the lower back, not forcing the shoulder down.
- Repeat: After a few deep breaths, come back to center and switch sides.
Section 3: Standing Strong, Not Stretching Far – Accessible Standing Poses
Standing poses are essential for building leg strength, improving balance, and strengthening your core—all things that help reduce your reliance on flexibility for good posture. These poses focus on stability and structure, not extreme range of motion.
1. The Underrated Foundation: Mountain Pose (Tadasana)

This pose might sound ridiculously simple—it’s just standing!—but it is the most important pose in all of yoga. It teaches you how to stand tall, how to align your body, and how to feel grounded.
- The Basic Idea: Standing with impeccable posture and awareness.
- Why It’s Great for Stiffness: It’s not a stretch, but an alignment adjustment. It literally retrains your body how to hold itself up, instantly relieving chronic stress on your joints.
- How to Do It (The Easy Way):
- Stand with your feet either hip-width apart or touching (choose what feels more stable).
- Ground Down: Wiggle your toes, then spread them wide and press all four corners of your feet firmly into the floor. Feel the arch of your foot lift slightly.
- Engage: Gently pull your belly button slightly in and up (just enough to feel your core awaken).
- Shoulders: Roll your shoulders up, back, and let them drop down. Imagine your shoulder blades sliding down your back pockets.
- Head: Tuck your chin slightly, so your ears stack directly over your shoulders. Imagine a string pulling the crown of your head up to the ceiling.
- Stay Here: Just stand. Breathe. Try to hold this perfect posture for 30 seconds. This is your foundation.
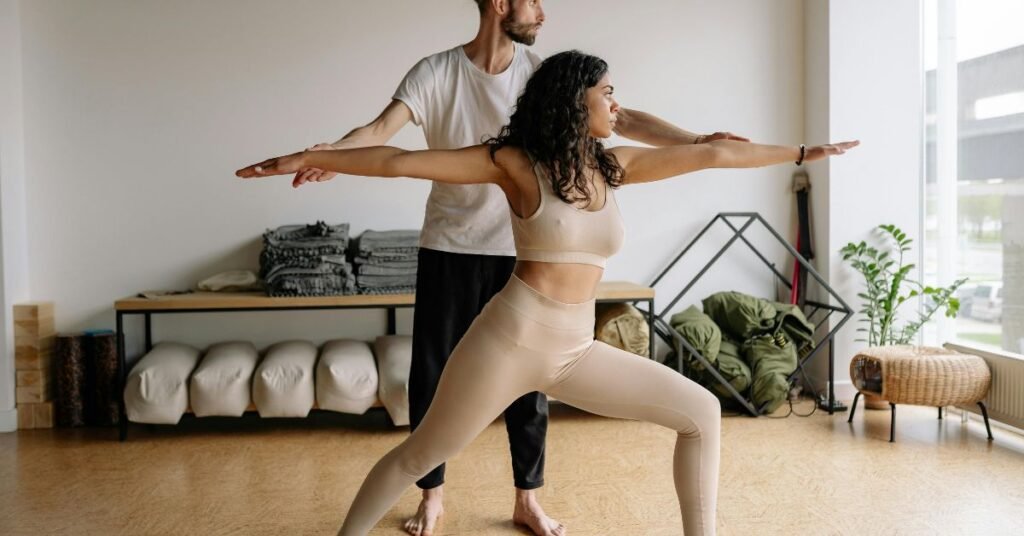
2. Hip and Thigh Power: Warrior I (Virabhadrasana I)
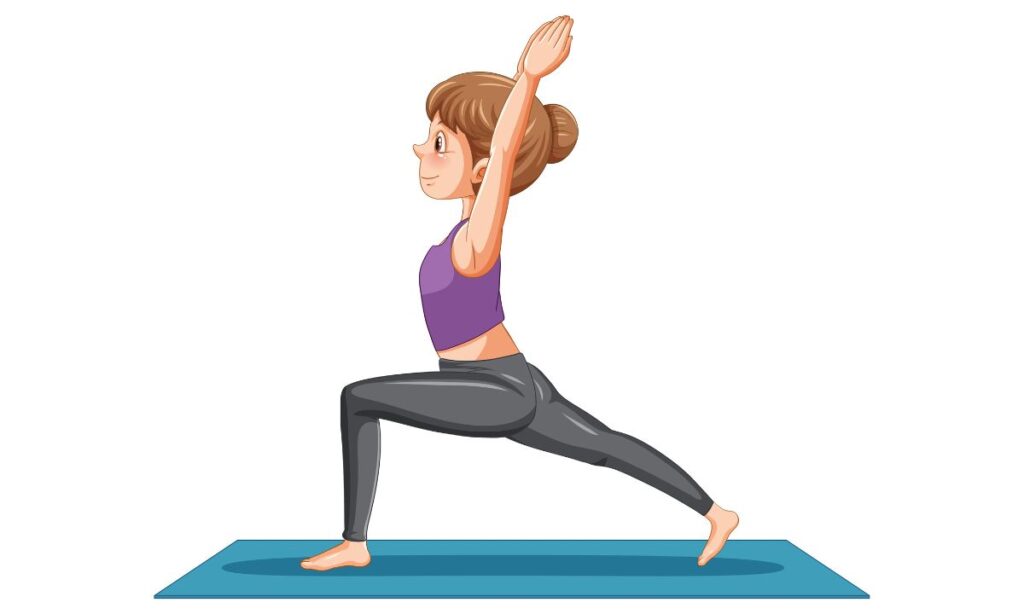
This pose is a powerhouse for building leg strength and opening the front of your hip (hip flexors), which are often painfully tight from sitting. The focus here is on foot placement, not how deep you can sink.
- The Basic Idea: A strong, asymmetrical stance that builds heat and stability.
- Why It’s Great for Stiffness: The hip flexor stretch comes naturally, without forcing it, and the pose focuses more on the strength of your legs and core than on deep flexibility.
- How to Do It (The Easy Way):
- From Mountain Pose, step your left foot back about 3-4 feet.
- Foot Placement is Key: Angle your back (left) foot out about 45 degrees, pressing the outer edge of that foot firmly into the floor.
- Bend your front (right) knee until it is roughly over your ankle. Stop here if you feel any knee pain. The front thigh doesn’t have to be parallel to the floor!
- Hips: This is the hard part for stiff people: try to square your hips toward the front of your mat. It’s okay if they don’t get there perfectly—just aim in that direction.
- Upper Body: Inhale, and sweep your arms up toward the ceiling. Keep those shoulders relaxed away from your ears!
- Repeat: After holding for a few breaths, step forward and switch sides.
3. Balance, Not Bending: Tree Pose (Vrksasana)
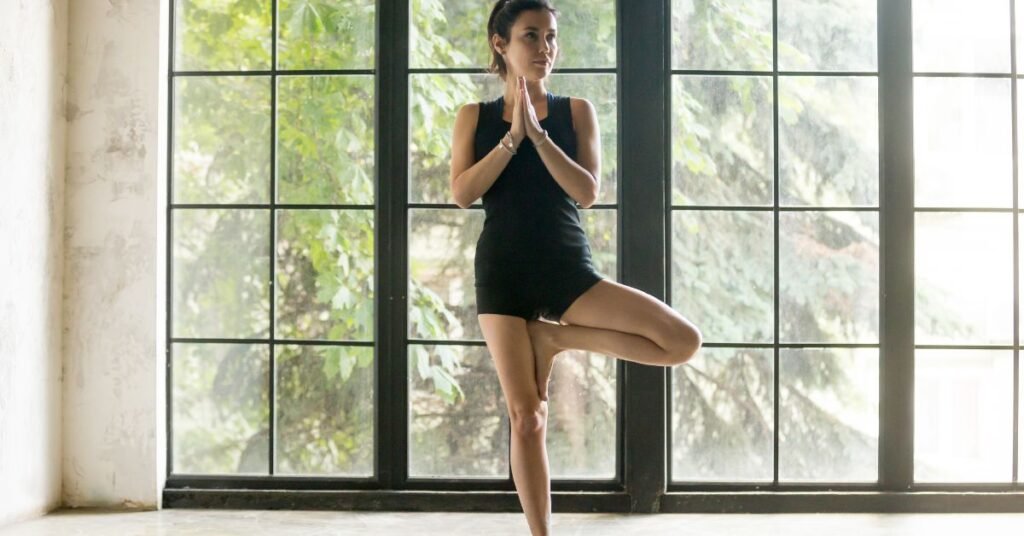
This one is purely a balance pose, which is great because it gives your tight hamstrings a break and puts the focus squarely on your sense of focus and stability.
- The Basic Idea: Balancing on one leg, with the sole of your other foot resting somewhere along your standing leg.
- Why It’s Great for Stiffness: It’s a core- and focus-builder. It demands gentle outer hip opening, but you control the intensity completely.
- How to Do It (The Easy Way):
- Start in Mountain Pose. Shift your weight into your right foot.
- The Foot Placement (Crucial for Non-Flexible): Bend your left knee and bring the sole of your left foot to rest on your inner right ankle or on your inner right calf. NEVER on the knee joint itself! You can even keep your left toes on the floor like a kickstand.
- Hands: Bring your hands together at the center of your chest (prayer position).
- The Gaze: Find one unmoving spot on the floor or wall in front of you—your drishti—and stare at it. If you wobble, laugh it off and start over.
- The Pro-Tip Modification (For Wobblers): Stand right next to a wall. You can put your fingertips on the wall for extra support and practice the balance without the fear of falling over.
4. The Great Decompression: Downward-Facing Dog (Adho Mukha Svanasana) – The Bent-Knee Version
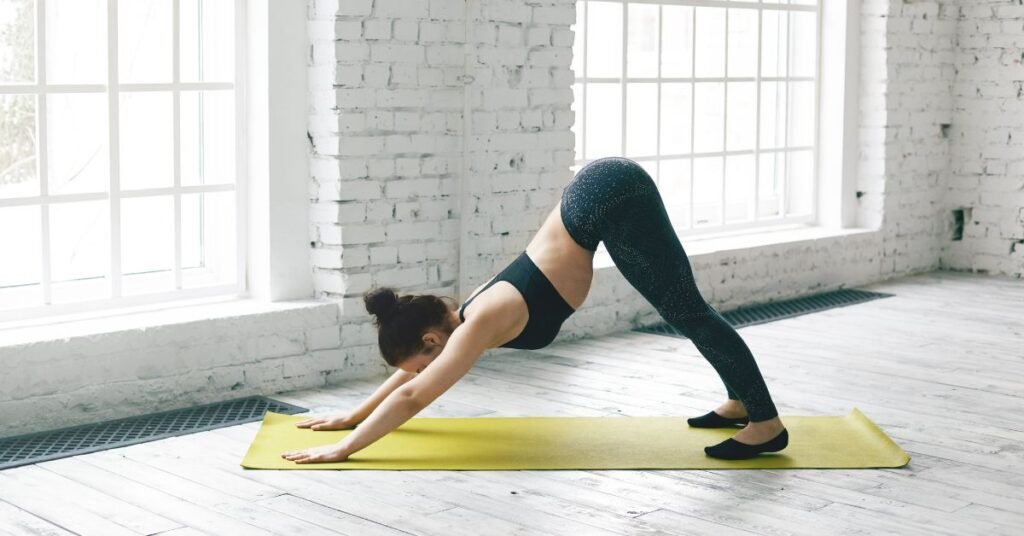
Okay, Downward Dog. It’s famous for being a deep hamstring stretch, which is why it’s often skipped by stiff beginners. But it doesn’t have to be! When done with bent knees, it is a magnificent pose for decompressing the spine, resting the heart above the head, and stretching the shoulders.
- The Basic Idea: Forming an inverted “V” shape with your body.
- Why It’s Great for Stiffness (with the modification): By bending your knees deeply, you take the intense pull out of the hamstrings and transfer the stretch and effort to where it’s needed: your back, shoulders, and arms.
- How to Do It (The Easy Way):
- Start on your hands and knees. Spread your fingers wide and press firmly through your palms.
- Tuck your toes under and lift your hips up and back.
- The Modification (Bend Your Knees!): Bend your knees as much as you need to. This allows you to push your chest back toward your thighs and make your spine long and flat. This is the main goal!
- Imagine you are trying to make a perfectly flat slide from your wrists to your tailbone. Bending the knees allows you to achieve this beautiful length, while keeping the legs straight often just rounds the back.
- You can “pedal” your feet—bending one knee and straightening the other—to gently warm up the calves, but never sacrifice your long spine for straight legs.
Section 4: Your New Yoga Toolkit – Props and Modifications Are Your Superpowers
Remember that story about Carol? She found freedom with a block. You will too! Truly helpful yoga isn’t about forcing your body; it’s about supporting your body until it’s ready to open. Props aren’t crutches; they are positioning tools that help you get the benefits of the pose without the pain.
1. Yoga Blocks (The Swiss Army Knife)
- What they are: Usually dense foam, cork, or wood. You need two!
- How to use them (The Non-Flexible Way):
- Bringing the Floor to You: In any forward fold (like a seated forward fold or standing fold), place your hands on blocks instead of straining to reach the floor. This allows you to keep your spine straighter and focus on the back of your legs instead of rounding your back.
- Pillow for the Spine: Use them under your head in Child’s Pose, or under your hips in Supported Bridge Pose (as we already learned).
- Making Poses Shorter: Place them under your hands in poses like Cat-Cow to give your wrists a less-intense angle.
2. The Yoga Strap (The Arm Extender)
- What it is: A simple length of cotton or nylon webbing. You can use a belt, a tie, or a scarf instead.
- How to use it (The Non-Flexible Way):
- The Towel-Reach Trick: If you can’t reach your foot in a seated forward fold, loop the strap around the balls of your feet and hold the ends with your hands. Now you can pull gently and get a hamstring stretch without rounding your spine or straining your back.
- Shoulder Floss: Hold the strap wide between your hands and slowly lift your arms up and over your head, and then back behind you. This gently mobilizes stiff shoulders.
3. Blankets/Towels (The Cushioning Comfort)
- What it is: Any comfortable, thick blanket or a folded towel.
- How to use it (The Non-Flexible Way):
- Knee Protection: Place a folded blanket under your knees in any kneeling position (like Cat-Cow or Low Lunge) to save your kneecaps from the hard floor.
- Hip Lift: Sit on the folded edge of a blanket in any seated pose (like a simple cross-legged position). Elevating your hips slightly is a game-changer for stiff hips and lower back, instantly allowing you to sit up straighter and breathe easier.
Listen Up! Your number one job as a beginner yogi with limited flexibility is to make the pose fit your body, not force your body to fit the pose. These props are your tools for personalization. Use them proudly!
Section 5: Making It Stick – A Simple 10-Minute Beginner’s Routine
Now that you know the poses, let’s put them together into a super-accessible, no-flexibility-required routine. Do this every day, or even just three times a week, and I promise you will feel a difference—not just in your body, but in your brain.
Equipment Needed: A mat, two blocks (or thick books), and one folded blanket/towel.
| Time | Pose Name (English/Sanskrit) | Instructions & Modification Focus |
| 1 Minute | Child’s Pose (Balasana) | Start on your knees, big toes touching. Knees wide or together. Rest your forehead on stacked fists or a block. Focus on deep belly breaths. |
| 2 Minutes | Cat-Cow (Marjaryasana/Bitilasana) | Move slowly and rhythmically with your breath. Use a blanket under your knees for padding. Focus on feeling the whole length of your spine articulate. |
| 1 Minute | Mountain Pose (Tadasana) | Come to standing. Feet hip-width apart. Find your perfect posture, stack your joints, and stand tall. Focus on grounding your feet. |
| 3 Minutes | Warrior I (Virabhadrasana I) | 1.5 minutes on the right side, 1.5 minutes on the left. DO NOT sink too deep. Focus on a gentle bend in the front knee and pushing into the outer edge of the back foot. |
| 2 Minutes | Supported Bridge Pose (Setu Bandhasana) | Lie on your back. Lift hips and slide a block (on its lowest or middle setting) under your sacrum. Relax completely. Let your arms rest beside you. |
| 1 Minute | Reclined Spinal Twist (Supta Matsyendrasana) | 30 seconds to the right, 30 seconds to the left. Use a block or pillow under the top knee for support. Focus on relaxing the low back and belly. |
| TOTAL: 10 Minutes |
This simple flow touches on all the key movements: spinal flexion/extension (Cat-Cow), standing strength (Warrior I), gentle hip opening (Warrior I, Supported Bridge), and a restorative wind-down (Twist). It requires no fancy folding, bending, or balancing. It’s perfect.
In Conclusion: Your Body is Ready Now
If you’ve made it this far, congratulations! You have already taken the hardest step: the one where you decided to drop the self-limiting belief that you aren’t “enough” to start.
The truth is, your level of flexibility today is the starting point of your practice. It is not an obstacle to your practice. The benefits of yoga—the calmer nervous system, the improved sleep, the reduced back pain, and yes, the eventual increase in range of motion—are available to you right now, in the gentlest, most supported version of every pose.
Don’t wait until you can touch your toes. Start today with a block, a blanket, and an open mind. Start with the simple truth that you deserve to move and feel better in your own skin.
The yogis on Instagram look amazing, but remember: the most beautiful yoga pose is the one that feels the best and serves your body right now. And that, my friend, is a perfect pose every single time. Now go grab a towel and get on the floor!

Theo is a dedicated yoga instructor with over six years of experience guiding individuals toward balance, strength, and inner peace through the transformative practice of yoga.As the founder of Pure Yoga Vibes, Theo offers expert insights, inspiring routines, and a wealth of knowledge to support your wellness journey. Committed to fostering a space for growth and mindfulness, Theo’s mission is to make yoga accessible, enjoyable, and meaningful for everyone.
For inquiries or collaborations, feel free to reach out at contact@pureyogavibes.com.